The Android accessibility settings are designed to help disabled people with disabilities use their phones comfortably. But, sadly many of those options also make everyday use easier and more efficient to navigate our phones. They also allow you to simplify the way your Android phone is accessed by these accessibility features.
Easily Access Important Functions
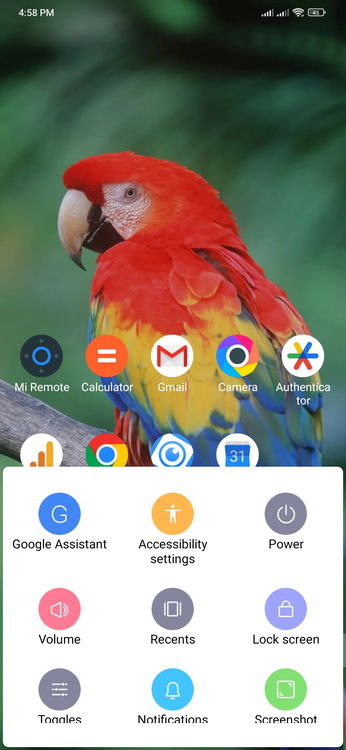
You can also activate the Accessibility Menu button, which adds a menu icon to the corner of screen for quick access in the accessibility settings and allows you to use essential functions. This lets you use Google Assistant, adjust volume, lock the screen and access quick settings, take screenshots or more. The menu is easy to do everyday things, since I work mostly on a PC and often have only one hand free.
If you want it to work, simply open Accessibility inside the Settings (might needing to open***Additional settings** on some phones) in order to enable it. In this case, you open Accessbility menu and toggle on the ** Accessibility menu shortcut**.
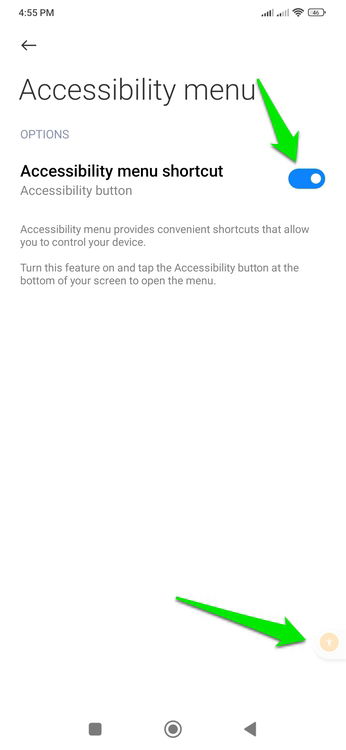
Then, this will add a small button at the bottom edge of the screen that you can tap to access various functions. You can swipe right on the button to hide it, and hold-and-drag to change its position.
See More Display Content
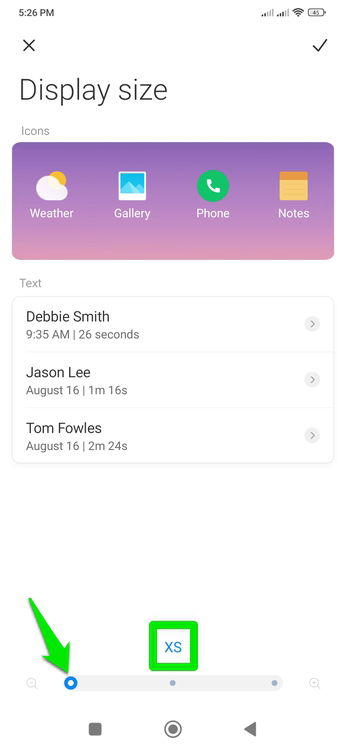
In accessibility settings, the screen contents are also large to make it possible for people with impaired vision to see what is in a clear view. It works in both ways; it can also double contents size and reduce from default size. I want the screen size to fit in more content at once, so that scrolling is less.’ For s, I prefer reducing the size of the screens for smaller viewing and easier reading (i.e.
Accessibility (in the tab Vision) and tap on Display size in Discaption. If you default set it to Small, put the change in ExtraSmalel (XS) and confirm that this is a correct choice; set up with extrasmalt (xS),. All the screen contents should be resized to reduce size and display more content at once.
Make Text Easier to Read
high contrast texts to make skim easier by using text settings like a . It makes text much easier to read (especially in dark mode) because it is either pure black or pure white with a thin outline. My phone is in the sunlight and I personally think it’s very useful, because when using my phone there does text pop out (and more distinguishable) from that particular person.
Open Accessibility and go to the Vision tab. During the Experimental section, enable High contrast text toggle at the bottom. This will apply very high contrast text to phone text and most app UIs. However, it won’t affect web content as sites use their own CSS code.
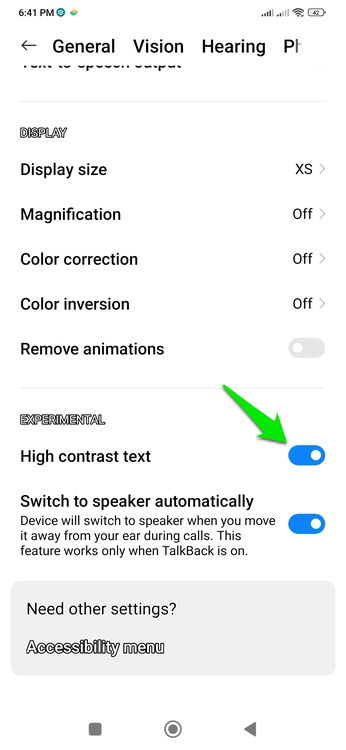
Should I mention that high contrast text can also sometimes make some apps’ text messed up. This is a question you should know when the text looks bad and it’s advisable to turn off this feature while I have never had this problem.
Manage Audio Balance
When I use earbuds, one ring is often open to know what my surroundings are like so that the audio balance functions of accessibility settings ensure best audio experience. In Accessibility, if you enter the Hearing tab in Assumptions (see below) option to control audio balance and activate **Mono audio. For single ear use, these are the best ones because they ensure you get the most audio from one side.
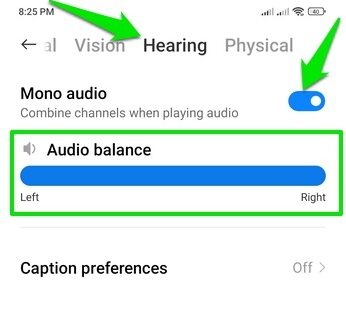
The audio balance slider will allow you to turn off one earbud side and silence so that it doesn’t disturb others. Also enable mono audio to ensure no side-only sound is left out. They can also be very useful when one side of the headphones is faulty, so you can balance audio sides or completely disable the blundering head?
End Calls Faster
It can be annoying when someone starts talking to you and the call is still on, ending a call takes 2-3 seconds. This delays are a result of the proximity sensor taking 2 seconds to turn on screen, phone accepting input and the network doing the handshake. You can prevent much of this delay by putting the power button on end calls.
When a call is immediately terminated, it will be to your ear by the power button and when the phone is still to you. It will still be the network handshake delay but it will remove the UI interaction delay, while this is not necessarily associated with any other delayed delays. The loss of either is nothing; a power button, in essence, acts as’screen sleep/wake function’ during if called (which already comes with proximity sensor automatically).
To enable this, go to Accessibility and then the Physical tab is accessed. Here, enable the Power button ends call option for s.

They’re just a few of the best settings for accessibility to make the phone more comfortable to use, and I recommend going back in on the rest as well. It is one of the most useful s out there – and they’re especially helpful when you’m setting up a senior phone.
Thanks for reading Use These Android Accessibility Settings to Make Your Phone More Intuitive
